 how-to
Choose the Right Teeth Whitening Shade: A 2026 Guide
Table of Contents
- Understanding the Teeth Whitening Shade Guide Explained
- Assessing Your Natural Tooth Color and Enamel Condition
- Skin Tone and Undertone Matching for Your Ideal Shade
- Professional Teeth Whitening vs At-Home Kits: Which Shade Results Can You Expect
- Setting Realistic Expectations for Shade Lightening
- How Long Does Professional Teeth Whitening Last and Maintaining Your Shade
- Managing Tooth Sensitivity When Pursuing Lighter Shades
- Consulting a Dentist for Shade Selection and Treatment Planning
- Frequently Asked Questions
Last Updated: October 4, 2026
Understanding the Teeth Whitening Shade Guide Explained
Choosing the right teeth whitening shade requires balancing your natural tooth color, skin tone, and realistic expectations to select a shade that looks natural and complements your appearance.
The teeth whitening shade guide is the standard tool dentists use to measure and compare tooth colors. Understanding how it works gives you control over your whitening results.
How the VITA Shade Guide Works
The VITA Shade Guide contains 16 shade tabs in four groups: A (reddish-brown), B (reddish-yellow), C (gray), and D (reddish-gray), numbered 1-4 from light to dark. Dentists hold these tabs next to your teeth under standardized lighting to determine your current shade and measure improvement after whitening. The tabs represent real tooth colors based on how enamel and dentin reflect light, helping you set realistic goals.
Interpreting Shade Codes and Brightness Levels
Each shade code's letter indicates undertone (warm or cool) and the number indicates brightness level. For example, A1 is warm and bright, while C3 is cooler and medium. Most people can realistically achieve 2-4 shades lighter than their starting point; going beyond that requires aggressive bleaching (which damages enamel) or cosmetic veneers.
Assessing Your Natural Tooth Color and Enamel Condition
Your natural tooth color depends on enamel thickness and dentin color. Enamel is the hard outer layer; dentin underneath is naturally more yellow. Thinner enamel shows more yellow; thick enamel appears whiter.
In natural daylight, yellow-toned teeth (B or A shades) respond better to whitening than gray-toned teeth (C or D shades), which are harder to shift. Check for cracks, chips, or worn edges, whitening only changes color, not structure.
Skin Tone and Undertone Matching for Your Ideal Shade
Your skin tone and undertone dramatically affect which shade looks best on you.
Understanding Warm vs. Cool Undertones
Identify your undertone by checking your inner wrist veins (greenish = warm, bluish = cool), testing gold vs. silver jewelry (gold = warm, silver = cool), or holding white paper next to your face (yellow/peachy = warm, pink/rosy = cool).
Shade Recommendations by Undertone
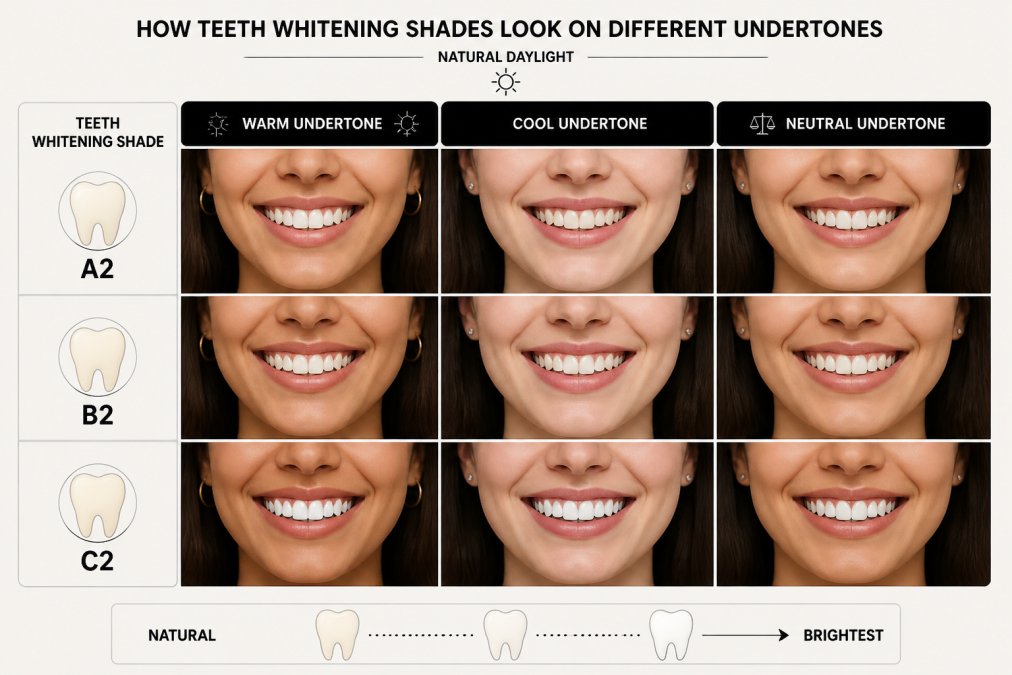
Warm undertones (golden, peachy, olive skin): Choose warm-toned whites (A and B shades) like A2, A3, B1, and B2. These have a golden cast that complements warm skin.
Cool undertones (pink, red, rosy skin): Choose cooler-toned whites (C and D shades) like C1, C2, D1, and D2.
Neutral undertones: A2, B2, and C2 work well; you can lean warmer or cooler based on preference.
How Shade Brightness Interacts with Skin Tone
Darker skin tones often look more natural with shades 2-3 levels lighter than your starting point (like A3 or B2) rather than the brightest available, as brighter shades can create too much contrast.
The Contrast Principle
The most flattering shade creates pleasing contrast without looking artificial. A shade too bright can look fake and make skin appear darker. When your dentist shows shade tabs, ask them to hold them in natural daylight and take phone photos of each tab next to your face for accurate everyday lighting comparison.
Professional Teeth Whitening vs At-Home Kits: Which Shade Results Can You Expect
The difference between professional and at-home whitening isn't just speed. It's also the depth of shade improvement you can realistically achieve.
Professional Treatment Results and Customization
Professional whitening uses higher concentrations of bleaching agents (25-40% hydrogen peroxide) applied under controlled conditions. Most people see 4-8 shades of improvement in a single session, depending on starting shade, enamel thickness, and response to bleaching. Your dentist can customize concentration and technique for sensitive teeth or maximum lightening. Results appear immediately and continue improving over 24 hours.
At-Home Whitening Strips and Trays
At-home strips and trays use lower concentrations (3-10% hydrogen peroxide) worn daily for 7-14 days, producing 2-4 shades of improvement. Custom trays fit better and deliver more consistent results than over-the-counter strips, which don't conform perfectly to tooth shape.
Setting Realistic Expectations for Shade Lightening
Your teeth have a natural ceiling based on enamel thickness and starting color. Someone starting at D3 might reach B3 or B4, which is still dramatic. Extrinsic stains (surface stains from coffee, wine, tobacco) whiten easily; intrinsic stains (inside the tooth from medications or aging) are harder to lighten. A shade 3-4 levels lighter usually looks natural; anything beyond often looks artificial. Your dentist can explain what's realistic for your teeth.
How Long Does Professional Teeth Whitening Last and Maintaining Your Shade
Professional whitening results typically last 6-12 months, fading gradually as new staining accumulates. To extend results, avoid dark beverages for 48 hours after treatment, use whitening toothpaste, rinse after staining foods, and schedule annual touch-ups (20-30 minutes) to maintain brightness.
Managing Tooth Sensitivity When Pursuing Lighter Shades
Tooth sensitivity is common during whitening. Understanding its causes and prevention strategies is critical to achieving your shade goals comfortably.
Why Whitening Causes Sensitivity
Whitening sensitivity occurs when bleaching agents reach the dentin layer, opening microscopic tubules that connect to the nerve. Cold sensations travel down these tubules, causing sharp pain. Sensitivity is temporary, tubules close once bleaching stops and saliva remineralizes enamel, but discomfort ranges from mild to severe.
Who Is Most at Risk for Sensitivity
You're at higher risk for sensitivity if you have pre-existing sensitive teeth, gum recession, cracks or chips, grind your teeth, have a history of aggressive brushing or acidic diet, or use whitening too frequently. Discuss sensitivity prevention with your dentist before treatment.
Prevention Strategies Before and During Treatment
Pre-treatment preparation (1-2 weeks before whitening):
- Use desensitizing toothpaste (potassium nitrate or strontium chloride) twice daily to block dentin sensation.
- Ask your dentist about fluoride or calcium phosphate treatment to strengthen enamel.
- Avoid acidic foods and drinks (citrus, soda, wine, vinegar).
- Don't use whitening products; let enamel stabilize.
During professional treatment:
- Inform your dentist if you have a history of sensitivity. They can use a lower-concentration bleaching gel (15-25% instead of 35-40% hydrogen peroxide) and apply it in shorter intervals.
- Ask about desensitizing agents applied during treatment. Many professional whitening systems include a potassium nitrate or calcium phosphate layer applied before or after the bleaching gel.
- Request gum protection. Your dentist should apply a rubber dam or protective barrier to isolate your teeth and prevent bleaching gel from contacting your gums or exposed root surfaces.
During at-home treatment:
- Use custom trays made by your dentist rather than over-the-counter strips. Custom trays fit precisely and prevent excess gel from contacting sensitive areas.
- Apply a thin layer of desensitizing gel to the tray before adding whitening gel. This creates a protective layer.
- Reduce wear time. Instead of wearing strips for the recommended 30 minutes, try 15-20 minutes daily. Results take longer but sensitivity is often reduced.
- Skip every other day. Whitening every other day instead of daily gives your enamel time to remineralize between treatments.
Managing Sensitivity During and After Treatment
If sensitivity occurs despite prevention efforts:
- Immediately after treatment: Rinse your mouth with lukewarm water (not cold). Avoid cold drinks, ice cream, and cold air for at least 24 hours.
- For acute pain: Use a desensitizing toothpaste or gel. Apply it directly to sensitive areas with your finger and leave it on for 5 minutes. Over-the-counter pain relievers (ibuprofen) can reduce inflammation if sensitivity is severe.
- Avoid triggering foods: Skip acidic foods, very hot foods, and very cold foods for 24-48 hours after treatment. These trigger pain in sensitized teeth.
- Use a soft-bristled toothbrush: Brush gently and avoid aggressive scrubbing, which can further expose dentin.
- Don't use whitening products: Stop whitening strips, whitening toothpaste, and any other bleaching products until sensitivity resolves.
Professional vs. At-Home Sensitivity Profiles
Professional whitening uses higher concentrations (25-40% hydrogen peroxide) applied for shorter periods (15-45 minutes). This causes more immediate sensitivity for some people, but the sensitivity is typically acute and short-lived (a few hours to a few days).
At-home whitening uses lower concentrations (3-10% hydrogen peroxide) worn for longer periods (30 minutes to several hours).
Some people with naturally sensitive teeth find that at-home treatments are more tolerable because they can control the duration and frequency.
Long-Term Sensitivity Management
After your whitening treatment is complete, continue using a desensitizing toothpaste if you experienced sensitivity. This maintains the protective effect and reduces sensitivity during future touch-up treatments.
When you schedule touch-up whitening (typically every 6-12 months), remind your dentist about your sensitivity history. They can adjust the protocol based on what worked or didn't work during your initial treatment.
Consulting a Dentist for Shade Selection and Treatment Planning
Your dentist does more than apply whitening gel. They assess your teeth, explain realistic outcomes, and help you choose a shade that works for your specific situation.
During a consultation, your dentist will:
- Examine your enamel thickness and overall tooth health
- Identify any existing cracks, chips, or restorations (these don't whiten)
- Discuss your shade goals and explain what's realistic
- Show you shade tabs and discuss which shades complement your skin tone
- Explain the difference between professional and at-home options
- Address any sensitivity concerns
At Trinity Dental Arts, our board-certified implantologist and cosmetic team work with you to understand your goals.
If you have existing dental work (crowns, veneers, fillings), whitening only affects your natural teeth.
Choosing the right shade for teeth whitening requires understanding the science, assessing your starting point, and setting realistic expectations. Trinity Dental Arts helps patients navigate this decision with professional guidance and customized treatment plans. Schedule a consultation to discuss your whitening goals and find the shade that's right for you.
Frequently Asked Questions
How does skin tone affect the choice of teeth whitening shade?
Your skin tone and undertone significantly influence which whitening shade will look most natural and flattering. Warm undertones typically pair well with slightly warmer, cream-colored shades, while cool undertones often suit brighter, whiter shades. Darker skin tones can carry whiter shades beautifully, while lighter complexions may find extremely bright shades appear unnatural. A dental professional can assess your undertone during a consultation to recommend the most harmonious shade for your specific complexion.
Which tooth shade is whiter, A1 or B1?
A1 is whiter than B1. The VITA shade guide organizes teeth into groups: A shades are the reddish-brown group, B shades are the reddish-yellow group, C shades are gray, and BL shades are the brightest. Within each group, lower numbers indicate lighter shades. A1 represents one of the brightest natural tooth shades available, while B1 is lighter than other B-group shades but not as bright as A1.
Is A1 tooth shade too white for a natural smile?
A1 is considered a natural shade, not artificially white. It represents the lightest end of naturally occurring tooth color and is one of the most popular choices for professional whitening because it appears bright yet authentic. However, whether A1 suits you depends on your skin tone, age, and personal preference. Some patients prefer slightly warmer shades like A2 or A3 for a softer appearance. A dental consultation can help determine if A1 aligns with your aesthetic goals and natural features.
How long does professional teeth whitening typically last?
Professional teeth whitening results typically last 6 to 12 months, depending on your diet, habits, and enamel porosity. Patients who consume staining foods and beverages like coffee, red wine, and dark sauces may see results fade faster. Smoking also accelerates discoloration. Touch-up treatments every 6 months can maintain your chosen shade. Your dentist can recommend a maintenance schedule based on your lifestyle and the specific whitening method used during your treatment.